
Popular categories
Looking for a yarn?


|
||||||||||
Enchanted Evening |
||||||||||
 |
 |
|||||||||
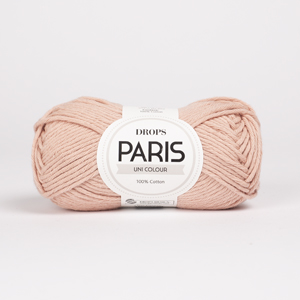
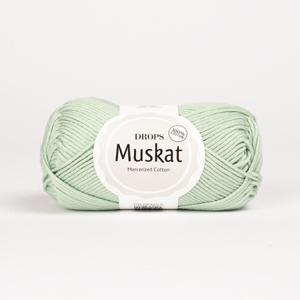
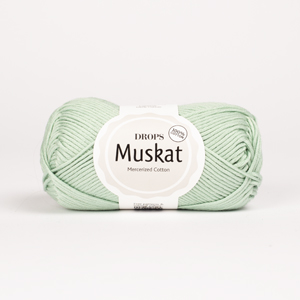
Knitted dress in DROPS Muskat. Piece is knitted top down with round yoke, knot pattern and short sleeves. Size: S - XXXL
DROPS 211-1 |
||||||||||
|
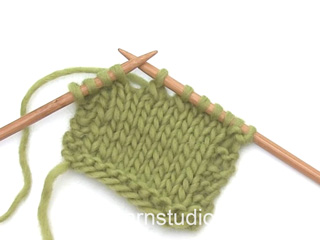
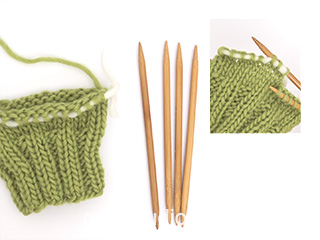
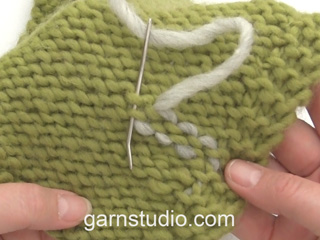
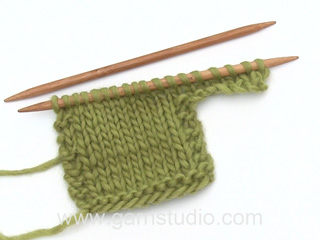
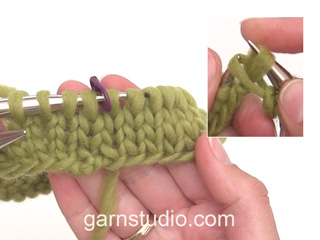
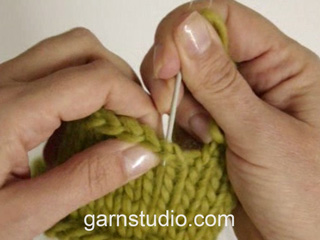
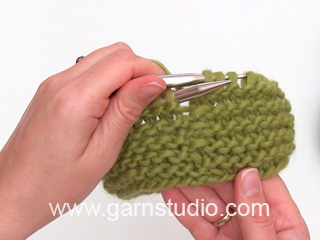
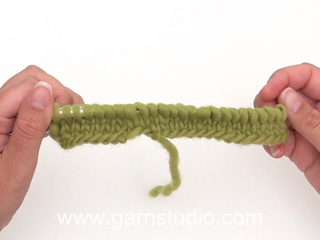
---------------------------------------------------------- EXPLANATION FOR THE PATTERN: ---------------------------------------------------------- PATTERN: See diagrams A.1 and A.2. Choose diagram for your size (applies to A.1). INCREASE/DECREASE TIP (evenly): To calculate how to increase/decrease evenly use the total number of stitches on row (e.g. 120 stitches) , and divide stitches by number of increases/decreases to be done (e.g. 18) = 6.7. In this example increase by making 1 yarn over after alternately approx. every 6th and 7th stitch. On next round knit yarn overs twisted to avoid holes. If decreasing knit in this example alternately approx. every 5th and 6th stitch and every 6th and 7th stitch together. INCREASE TIP-1 (applies to waist on body): Increase 1 stitch after 1st and 3rd marker thread and before 2nd and 4th marker thread as explained below. INCREASE AS FOLLOWS AFTER MARKER THREAD: Knit 1 stitch in loop around first stitch on left needle (i.e. In stitch from previous round). INCREASE AS FOLLOWS BEFORE MARKER THREAD: Work until marker thread, then knit 1 stitch around outermost stitch on right needle (i.e. in stitch from previous round). INCREASE TIP-2 (applies to sides of body): Increase the same way before and after marker as explained in INCREASE TIP-1, but increase alternately before and after marker. I.e. increase only 1 time in each side every 1½ cm = ½" and this happen alternately before and after marker (not on each side). DECREASE TIP (applies to waist of body): The first decreases will be at the same time as working pattern. Adjust to decrease on a round without knots, and note that there will be fewer stitches in stockinette stitch between 2 knots after a decrease. Decrease 1 stitch after 1st and 3rd marker thread and before 2nd and 4th marker thread as explained below. DECREASE AS FOLLOWS AFTER MARKER THREAD: Slip 1 stitch knitwise, knit 1, pass slipped stitch over stitch worked DECREASE AS FOLLOWS BEFORE MARKER THREAD: Work until 2 stitches remain before marker thread, knit 2 together. BIND-OFF TIP: To avoid a tight bind-off edge you may use a larger needle size. If this also is too tight, work a 1 yarn over after approx. every 8th stitch while binding off (bind off yarn overs as regular stitches). ---------------------------------------------------------- START THE PIECE HERE: ---------------------------------------------------------- DRESS - SHORT OVERVIEW OF THE PIECE: Work neck edge and yoke in the round on circular needle from mid back, top down. Divide yoke for body and sleeve edges. Body is worked in the round on circular needle, top down. Work sleeve edges in the round on double pointed needles, top down. NECK EDGE: Cast on 120-124-130-134-138-140 stitches on a short circular needle size 3 mm = US 2,5 with Muskat. Knit 1 round. Then work rib in the round (= knit 1/purl 1) for 4 cm = 1½". Knit 1 round while increasing 18-26-32-16-22-35 stitches evenly - read INCREASE/DECREASE TIP = 138-150-162-150-160-175 stitches. Knit 1 round where yarn overs are knitted twisted. Insert 1 marker in the middle of round (= mid front). Measure yoke from this marker! Then work yoke as explained below. YOKE: Switch to circular needle size 4 mm = US 6 and work A.1 in the round (= 23-25-27-30-32-35 repetitions of 6-6-6-5-5-5 stitches). Continue pattern like this , and increase as shown in A.1. REMEMBER THE KNITTING GAUGE! When A.1 has been worked, there are 230-250-270-300-320-350 stitches on needle. Then work A.2 in the round (= 23-25-27-30-32-35 repetitions of 10 stitches). Continue pattern like this and increase as shown in A.2. After last increase in A.2 there are 276-300-324-360-384-420 stitches on needle. Work until piece measures 17-19-21-23-25-27 cm = 6¾"-7½"-8¼"-9"-9¾"-10⅝" from marker at the neck - NOTE: Work A.2 as far as you can until correct measurements and in some sizes A.x must be repeated vertically until correct measurements (pattern should continue on body). Now divide yoke for body and sleeves, i.e. work next round as follows from mid back: Work 38-42-45-51-56-62 stitches as before (= ½ back piece), slip the next 62-66-72-78-80-86 stitches on 1 stitch holder for sleeve edge, cast on 6-6-8-8-10-10 new stitches on row (= in the side under sleeve), work 76-84-90-102-112-124 stitches as before (= front piece), slip the next 62-66-72-78-80-86 stitches on 1 stitch holder for sleeve edge, cast on 6-6-8-8-10-10 new stitches on row (= in the side under sleeve) and work the remaining 38-42-45-51-56-62 stitches as before (= ½ back piece). Cut the yarn. Finish body and sleeve edges separately. NOW MEASURE PIECE FROM HERE! BODY: = 164-180-196-220-244-268 stitches. Insert 1 marker in each side on body, in the middle of the 6-6-8-8-10-10 stitches cast on under each sleeve. Insert in addition 4 marker threads in the piece as follows: Count 21-24-27-32-37-42 stitches from marker in one side of piece, insert 1st marker thread before next marker, count 40-42-44-46-48-50 stitches, insert 2nd marker thread before next stitch, count 42-48-54-64-74-84 stitches (maker in the side is in the middle of these stitches), insert 3rd marker thread before next stitch, count 40-42-44-46-48-50 stitches, insert 4th marker thread before next stitch. 21-24-27-32-37-42 stitches remain on round after last marker thread. Move the marker threads upwards when working; they should be used for decrease and increase later. Now continue A.x while AT THE SAME TIME decreasing in the sides on body as explained below: Begin round at marker in one side of piece and work A.x in the round, but make sure to continue on correct row in diagram according to where piece was divided, and make sure to place knots correctly over knots on yoke. Work 6-6-8-8-10-10 stitches cast on under each sleeve in stockinette stitch. When piece measures 6 cm = 2⅜" from division in all sizes, finish A.x, but finish after 1 round with knots. Continue to work stockinette stitch in the round over all stitches. AT THE SAME TIME when piece measures approx. 3 cm = 1⅛" from division in all sizes, decrease 1 stitch after 1st and 3rd marker thread and before 2nd and 4th marker thread – read DECREASE TIP (= 4 stitches decreased). Decrease like this every 2½ cm = ⅞" 4 times in total vertically = 148-164-180-204-228-252 stitches. When piece measures 16 cm = 6¼" from division in all sizes, increase 1 stitch after 1st and 3rd marker thread and before 2nd and 4th marker thread – read INCREASE TIP-1. Increase in addition 1 stitch at marker in each side - read INCREASE TIP-2 (= 6 stitches increased in total on round). Increase like this every 2 cm = ¾" 21 times vertically in all sizes = 274-290-306-330-354-378 stitches. Work without increases until piece measures approx. 61-62-63-64-65-66 cm = 24"-24⅜"-24¾"-25½"-26" from division (approx. 2 cm = ¾" remain until finished measurements, try the dress on and work to desired length). Knit 1 round while increasing 20-22-24-26-26-28 stitches evenly = 294-312-330-356-380-406 stitches (increase a little to avoid the rib to be worked from contracting the edge). Switch to circular needle size 3 mm = US 2,5. Work rib in the round = knit 1/purl 1 for 2 cm = ¾". Bind off with knit over knit and purl over purl - read BIND-OFF TIP. Dress measures approx. 85-88-91-94-97-100 cm = 33½"-34⅝"-35¾"-37"-38½"-39⅜" from shoulder and down. SLEEVE EDGE: Slip the 62-66-72-78-80-86 stitches from stitch holder in one side of piece on double pointed needles size 4 mm = US 6 and pick in addition up 1 stitch in each of the 6-6-8-8-10-10 new stitches cast on under sleeve = 68-72-80-86-90-96 stitches. Begin round in the middle of the 6-6-8-8-10-10 stitches that were cast on under sleeve and work 3 rounds in stockinette stitch. AT THE SAME TIME on last round decrease 4-4-4-4-2-2 stitches evenly - remember INCREASE/DECREASE TIP = 64-68-76-82-88-94 stitches. Switch to double pointed needles size 3 mm = US 2,5. Work rib in the round = knit 1/purl 1 for 3 cm = 1⅛". Bind off with knit over knit and purl over purl - remember BIND-OFF TIP! Sleeve edge measures approx. 4 cm = 1½" from division. Work the other sleeve edge the same way. |
||||||||||
Diagram explanations |
||||||||||
|
||||||||||

|
||||||||||

|
||||||||||
|
Have you made this or any other of our designs? Tag your pictures in social media with #dropsdesign so we can see them! Do you need help with this pattern?You'll find tutorial videos, a Comments/Questions area and more by visiting the pattern on garnstudio.com. © 1982-2024 DROPS Design A/S. We reserve all rights. This document, including all its sub-sections, has copyrights. Read more about what you can do with our patterns at the bottom of each pattern on our site. |
||||||||||


With over 40 years in knitting and crochet design, DROPS Design offers one of the most extensive collections of free patterns on the internet - translated to 17 languages. As of today we count 304 catalogs and 11422 patterns - 11417 of which are translated into English (US/in).
We work hard to bring you the best knitting and crochet have to offer, inspiration and advice as well as great quality yarns at incredible prices! Would you like to use our patterns for other than personal use? You can read what you are allowed to do in the Copyright text at the bottom of all our patterns. Happy crafting!
Comments / Questions (63)
Wie geht das? Wie macht man die Zunahme, wie immDiagramm beschrieben? Siehe Text: symbols = 1 Masche zunehmen, indem 1 Masche rechts in die Masche der vorherigen Reihe gestrickt wird (d.h. in die Schlinge hinter der ersten Masche auf der linken Nadel), die Masche noch nicht von der linken Nadel gleiten lassen, die auf der linken Nadel liegende Masche (d.h. die Masche der aktuellen Reihe) rechts stricken und dann die Masche von der linken Nadel gleiten lassen
21.05.2024 - 11:51DROPS Design answered:
Liee Michaela, in diesem Video zeigen wir, wie man so eine Masche zunimmt. Viel Spaß beim Stricken!
21.05.2024 - 14:23Det står sticka A.x när man har delat upp fram, bakstycke och ärmar. Jag ser bara mönster A1 och A2
16.04.2024 - 18:14DROPS Design answered:
Hej Sofia, du finder A.x øverst i diagram A.2 :)
18.04.2024 - 11:46Ich habe Größe M fertig gestrickt und trotz der Zunahmen vor dem Rippenmuster rollt sich der Rand stark nach innen. Was kann ich tun?
15.04.2024 - 14:11DROPS Design answered:
Liebe Nicole, Sie können das Kleid mit Stecknadeln auf einer geeigneten Unterlage spannen, anfeuchten (z.B. mit einer Sprühflasche für Blumen) und trocknen lassen, danach entfernen Sie die Stecknadeln, dann sollte sich der Rand nicht mehr rollen.
15.04.2024 - 15:47Hi! Still about the enchanted evening dress. In my question before, i mean: what method that we use to increase ( increase at diagram A.1 & A.2). Is that a left lifted increase(LLI)? Thx
10.10.2023 - 05:17DROPS Design answered:
Hi Yulia, You increase in diagrams A.1 and A.2 as described in the description above (for the open diamond). Happy knitting!
10.10.2023 - 06:40Hi! About enchanted evening dress. Now I’m working on diagram A.1 and A.2. Can you show me the video on how to do the increase at diagram? Because I’m little bit confuse about the description about the increase on diagram. Thx
10.10.2023 - 03:50DROPS Design answered:
Dear Yulia, sure, this video shows how to increase - look at the increase towards left side. Happy knitting!
10.10.2023 - 09:15Hallo liebes Team. Ich versteh nicht ganz wie ich in dem Diagramm die Maschen hinzufügen soll. ich vermute, dass dafür das Video "Aufnehmen 4- aus der Masche der Vorreihe" gedacht ist. aber ich verstehe nicht, warum in dem Video einmal von rechts und einmal von links die Masche verwendet wird und wie ich das jetzt auf das Diagramm beziehen muss. Danke für die Hilfe :)
25.09.2023 - 14:02DROPS Design answered:
Liebe Audrey, in diesem Video zeigen wir, wie so eine Zunahme gestrickt wird. In dem Video zeigen wir beide "Seite", im Kleid strickt man wie bei der "linke Seite" erklärt, dh zuerst die Zunahme stricken, dann die Masche selbst. Viel Spaß beim stricken!
25.09.2023 - 15:42I'm trying to understand which size I should knit based on the finished dimensions. Could you indicate whether this is meant to have positive, negative, or no ease?
08.09.2023 - 17:18DROPS Design answered:
Dear Emma, you can see the finished measurements in cm in the schematic after the pattern instructions. This model has little ease and it's meant to be fit. Happy knitting!
10.09.2023 - 19:18Bonjour, je ne comprends pas le passage sur AUGMENTATIONS-2 On me demande de faire 6 augmentation par tour en utilisant cette façon d'augmenter mais nous avons 4 marqueurs donc ce serait soit 4 soit 8 mais 6 je ne sais pas à quels marqueurs augmenter. J'ai compris qu'il ne fallait pas augmenter en même temps des deux côtés du même marqueur mais pourquoi 1,5 cm ? Ce ne serait pas plutôt tous les 1 cm augmenter de nouveau au niveau de 2 marqueurs ainsi passe de 4 augmentations à 6.
19.07.2023 - 17:24DROPS Design answered:
Bonjour Mme Combes, vous devez augmenter 6 mailles au total: 1 maille de chaque côté de la robe (1 maille à chacun des 2 marqueurs sur les côtés) + 1 maille à chacun des 4 fils marqueurs (alternativement avant et après ces fils marqueurs). Bon tricot!
28.07.2023 - 08:56Enchanted Evening: Ich möchte das Kleid gerne mit langen glatten Ärmeln statt der kurzen Puffärmel stricken. Gibt es dazu eine Anleitung? Danke für eine Hilfestellung!
12.01.2023 - 16:13Enchanted Evening: Ich möchte das Kleid gerne mit langen Ärmeln anstelle der kurzen Puffärmelchen stricken. Gibt es dazu auch eine Anleitung? Danke für eine Hilfestellung!
12.01.2023 - 16:10DROPS Design answered:
Liebe Tanja, leider können wir nicht jede Anleitung nach jeder Anfrage anpassen - aber vielleicht kann Ihnen die Anleitung von diesem Pullover weiterhelfen bzw inspirieren. Viel Spaß beim stricken!
12.01.2023 - 16:30