
Popular categories
Looking for a yarn?


|
|||||||||||||||||||||||||
Winter Delight |
|||||||||||||||||||||||||
 |
 |
||||||||||||||||||||||||
Knitted sweater for men in DROPS Merino Extra Fine. The piece is worked with cables and double moss stitch. Sizes S – XXXL.
DROPS 208-8 |
|||||||||||||||||||||||||
|
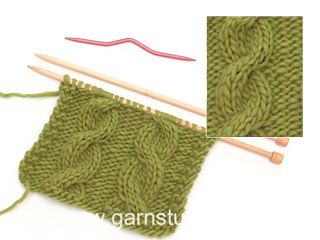
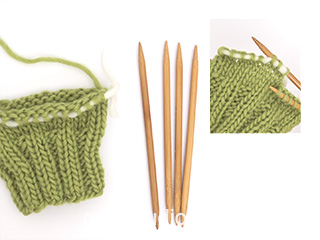
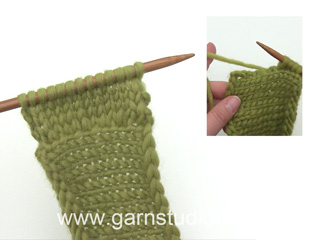
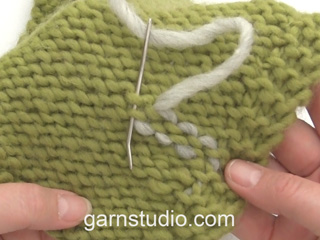
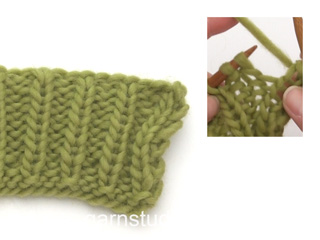
------------------------------------------------------- EXPLANATIONS FOR THE PATTERN: ------------------------------------------------------- RIDGE/GARTER STITCH (worked back and forth): Knit all rows. 1 ridge in height = Knit 2 rows. PATTERN: See diagrams A.1 to A.5. Choose diagram for your size (applies to A.2, A.3 and A.4). The diagrams show all rows in the pattern from the right side. KNITTING TIP: In this pattern stitches are knitted up along the armholes and the sleeves are worked top down. This is done to have better control over the length of the sleeves. If you wish, the sleeves can be worked separately and then sewn in; by casting on the same number of stitches as suggested are knitted up in the text and then following the instructions for the sleeves in the same way. Sew in the sleeves (the sleeve is placed under the garter stitch edge around the armhole leaving this edge visible – sew in the outermost stitch of the garter stitch edge). DECREASE TIP-1 (evenly spaced): To work out how to decrease evenly, count the total number of stitches on needle (e.g. 44 stitches) and divide by number of decreases to be made (e.g. 10) = 4.4. The decreases are worked from the right side! In this example decrease by knitting together alternately each 3rd and 4th stitch and each 4th and 5th stitch. DECREASE TIP-2 (for mid under sleeves): Decrease 1 stitch before the marker thread as follows: Work until there are 2 stitches left before the marker thread, knit 2 together if this stitch should be knitted or purl 2 together if this stitch should be purled. Decrease 1 stitch after the marker thread as follows: Knit 2 twisted together if this stitch should be knitted or purl 2 twisted together if this stitch should be purled. ------------------------------------------------------- START THE PIECE HERE: ------------------------------------------------------- SWEATER – SHORT OVERVIEW OF THE PIECE: Front and back pieces are worked back and forth with circular needle, bottom up. The shoulder seams are sewn together. Then stitches are knitted up around the armholes for the sleeves – read KNITTING TIP! The sleeves are worked back and forth until the sleeve cap is finished, then in the round with double pointed needles, top down. The bottom of the armhole is sewn together and the neck is worked to finish. BACK PIECE: Cast on 108-116-124-132-140-156 stitches with circular needle 3.5 mm = US 4 and Merino Extra Fine. Purl 1 row (= wrong side). The next row is worked as follows from the right side: 1 edge stitch in GARTER STITCH – read description above, * knit 1, purl 1 *, work from *-* until there is 1 stitch left on the row and finish with 1 edge stitch in garter stitch. Continue this rib for approx. 2 cm = ¾" but adjust so the last row is worked from the right side. Purl 1 row from the wrong side with 1 edge stitch in garter stitch on each side. Change to circular needle size 4.5 mm = US 7. Now begin the pattern as follows from the right side: 1 edge stitch in garter stitch, work A.1 over the next 16-20-24-24-28-36 stitches (= 4-5-6-6-7-9 repeats of 4 stitches), A.2 (= 23-23-23-26-26-26 stitches), A.3 (= 28-28-28-30-30-30 stitches), A.4 (= 23-23-23-26-26-26 stitches), A.5 over the next 16-20-24-24-28-36 stitches (= 4-5-6-6-7-9 repeats of 4 stitches) and finish with 1 edge stitch in garter stitch. Continue this pattern. REMEMBER THE KNITTING GAUGE! When the piece measures 47-48-49-50-51-52 cm = 18½"-19"-19¼"-19¾"-20"-20½", bind off 1-3-5-7-9-13 stitches at the beginning of the next 2 rows for the armholes = 106-110-114-118-122-130 stitches. Continue the pattern as before but now with 4 edge stitches in garter stitch on each side towards the armholes. When the piece measures 64-66-68-70-72-74 cm = 25¼"-26"-26¾"-27½"-28⅜"-29⅛", decrease 10 stitches evenly over the middle 44-44-44-48-48-48 stitches on the row – read DECREASE TIP-1 = 96-100-104-108-112-120 stitches left. On the next row (wrong side) bind off the middle 36-36-38-38-40-40 stitches for the neck and each shoulder is finished separately. Continue the pattern and bind off 1 stitch on the next row from the neck = 29-31-32-34-35-39 stitches left on the shoulder. Continue working until the piece measures 65-67-69-71-73-75 cm = 25½"-26⅜"-27⅛"-28"-28¾"-29½". Knit 1 row from the right side and knit 1 row from the wrong side. Loosely bind off with knit from the right side. Work the other shoulder in the same way. The back piece measures approx. 66-68-70-72-74-76 cm = 26"-26¾"-27½"-28⅜"-29⅛"-30" from the shoulder down. FRONT PIECE: Cast on 108-116-124-132-140-156 stitches with circular needle size 3.5 mm = US 4 and Merino Extra Fine. Purl 1 row (= wrong side). The next row is worked from the right side as follows: 1 edge stitch in GARTER STITCH – read description above, * knit 1, purl 1 *, work from *-* until there is 2 stitch left on the row and finish with 1 edge stitch in garter stitch. Continue this rib for 2 cm = ¾" but adjust so the last row is worked from the right side. Purl 1 row from the wrong side with 1 edge stitch in garter stitch on each side. Change to circular needle size 4.5 mm = US 7. Now begin the pattern as follows from the right side: 1 edge stitch in garter stitch, work A.1 over the next 16-20-24-24-28-36 stitches (= 4-5-6-6-7-9 repeats of 4 stitches), A.2 (= 23-23-23-26-26-26 stitches), A.3 (= 28-28-28-30-30-30 stitches), A.4 (= 23-23-23-26-26-26 stitches), A.5 over the next 16-20-24-24-28-36 stitches (= 4-5-6-6-7-9 repeats of 4 stitches) and finish with 1 edge stitch in garter stitch. Continue this pattern. When the piece measures 47-48-49-50-51-52 cm = 18½"-19"-19¼"-19¾"-20"-20½", bind off 1-3-5-7-9-13 stitches at the beginning of the next 2 rows for the armholes = 106-110-114-118-122-130 stitches. Continue the pattern as before but now with 4 edge stitches in garter stitch on each side towards the armholes. When the piece measures 57-59-61-62-64-66 cm = 22½"-23¼"-24"-24⅜"-25¼"-26", decrease 10 stitches evenly over the middle 44-44-44-48-48-48 stitches on the row = 96-100-104-108-112-120 stitches left. On the next row (wrong side) place the middle 20-20-22-22-22-22 stitches on 1 thread for the neck and each shoulder is finished separately. Continue the pattern and bind off stitches at the beginning of each row from the neck as follows: Bind off 2 stitches 3 times and then 1 stitch 3-3-3-3-4-4 times = 29-31-32-34-35-39 stitches left on the shoulder. Continue working until the piece measures 65-67-69-71-73-75 cm = 25½"-26⅜"-27⅛"-28"-28¾"-29½". Knit 1 row from the right side and knit 1 row from the wrong side. Loosely bind off with knit from the right side. Work the other shoulder in the same way. ASSEMBLY: Sew the shoulder seams inside the bind-off edge. SLEEVE: Knit up stitches along the armhole on the front and back piece; start in the corner of the armhole on the one side of the piece where stitches were bind off; knit up from the right side 76-80-84-88-92-96 stitches inside the 1 edge stitch in garter stitch with circular needle size 4.5 mm = US 7 and Merino Extra Fine (do not knit up stitches along the bottom of the armhole) – read KNITTING TIP! Work A.1 back and forth with 1 edge stitch in garter stitch on each side. When the sleeve measures 1-2-3-4-5-7 cm = ⅜"-¾"-1⅛"-1½"-2"-2¾" from where you knitted up stitches, insert 1 marker on the row; it marks where the sleeve will be sewn to the bottom of the armhole and the sleeve is measured from this marker! Continue working the sleeve in the round; change to double pointed needles or short circular needle size 4.5 mm = US 7. Insert 1 marker thread at the beginning of the round and allow it to follow your work onwards; it will be used when decreasing mid under the sleeve. Continue A.1 in the round over all stitches (= 19-20-21-22-23-24 repeats of 4 stitches). When the sleeve measures 3-2-3-2-3-2 cm = 1⅛"-¾"-1⅛"-¾"-1⅛"-2/4" from the marker decrease 2 stitches mid under the sleeve - read DECREASE TIP-2. Decrease like this every 3-3-2½-2-2-1½ cm = 1⅛"-1⅛"-⅞"-¾"-¾"-½" a total of 15-16-17-18-19-20 times = 46-48-50-52-54-56 stitches. Continue working until the sleeve measures 54-53-52-51-50-48 cm = 21¼"-21"-20½"-20"-19¾"-19" from the marker (there is approx. 2 cm = ¾" left to finished length; you can try the sweater on and work to desired length). Change to double pointed needles size 3.5 mm = US 4 and work rib (= knit 1 / purl 1) for 2 cm = ¾". Loosely bind off with knit. The sleeve measures approx. 57-57-57-57-57-57 cm = 22½"-22½"-22½"-22½"-22½"-22½" from where the stitches were knitted up. Work the other sleeve in the same way. ASSEMBLY: Sew the side seams – sew in the outermost loop of the outermost stitch so the seam is flat. Sew the sleeves to the bottom of the armholes, from the marker and in to the corner. NECK: Knit up from the right side (using short circular needle size 3.5 mm = US 4) approx. 80 to 94 stitches around the neck – including the stitches on the thread in front. Purl 1 round. Knit 1 round where you increase evenly to adjust to 90-92-94-96-100-102 stitches. Then work rib in the round (= knit 1 / purl 1) for 3 cm = 1⅛". Bind off with knit over knit and purl over purl. |
|||||||||||||||||||||||||
Diagram explanations |
|||||||||||||||||||||||||
|
|||||||||||||||||||||||||

|
|||||||||||||||||||||||||

|
|||||||||||||||||||||||||

|
|||||||||||||||||||||||||

|
|||||||||||||||||||||||||
|
Have you made this or any other of our designs? Tag your pictures in social media with #dropsdesign so we can see them! Do you need help with this pattern?You'll find tutorial videos, a Comments/Questions area and more by visiting the pattern on garnstudio.com. © 1982-2024 DROPS Design A/S. We reserve all rights. This document, including all its sub-sections, has copyrights. Read more about what you can do with our patterns at the bottom of each pattern on our site. |
|||||||||||||||||||||||||


With over 40 years in knitting and crochet design, DROPS Design offers one of the most extensive collections of free patterns on the internet - translated to 17 languages. As of today we count 304 catalogs and 11422 patterns - 11417 of which are translated into English (US/in).
We work hard to bring you the best knitting and crochet have to offer, inspiration and advice as well as great quality yarns at incredible prices! Would you like to use our patterns for other than personal use? You can read what you are allowed to do in the Copyright text at the bottom of all our patterns. Happy crafting!
Comments / Questions (24)
Bonjour Le diagramme A2 ne correspond pas à l'explication de la torsade Celle-ci est expliqué sur 6 mailles alors que sur le diagramme il y a 9 maillesf Pourriez vous m'aider En vous remerciant Cordialement
11.02.2023 - 16:21DROPS Design answered:
Bonjour Mme Buisson, cette torsade se tricote effectivement sur 6 mailles, mais vous tricoterez la torsade soit sur les 6 premières des 9 mailles jersey, soit sur les 6 dernières de ces mêmes 9 mailles jersey; autrement dit , tricotez le 3ème rang de A.2 ainsi: torsade sur 6 m, 3 m end; puis celle du 9ème rang ainsi: 3 m end, torsade sur 6 m (attention à bien suivre le symbole correspondant à chaque fois). Bon tricot!
13.02.2023 - 09:05The pattern for A2 S-M-L is suddenly dissapeared from the site! Can you please restore that?
17.11.2022 - 12:53DROPS Design answered:
Dear Cornelia, it looks like diagrams are back - if you can't see them, try to refresh the page, clean the cache/cookies and try again, it should work. Happy knitting!
17.11.2022 - 16:08Opeens zijn een paar onderdelen van het patroon verdwenen? A2 voor s-M en L wordt niet meer weergegeven? En ik ben net met het voorpand begonnen, dus dit is wel een probleem!!!
17.11.2022 - 12:35DROPS Design answered:
Dag Cornelia,
Het kan zijn dat de pagina tijdelijk niet goed wou laden. Heb je inmiddels het patroon in beeld kunnen krijgen. Anders eventueel even proberen met Shift + F5 of een andere browser.
20.11.2022 - 17:50DROPS Design, thank you for your reply, I could write a question at the beginning in English :) No worry, I already figured out the pattern and finished the front/back of the sweater already :) Thank you again
16.11.2022 - 14:46Dobry den, nerozumiem ako mam zacat uberat ocka na priekrcnik. V navode sa uvadza, ze nad prostrednymi 44 ockami mam ubrat 10 ok - prostrednych 44 ociek mi zasiahne aj do schemy A4, A2 a teda ju narusim. Ked si ale porovnam sveter z ilustracneho obrazka, schema A4 a A2 pokracuje az na ramena. Nie je v navode chyba? Dakujem
13.09.2022 - 14:54DROPS Design answered:
Hi, if you can write your question in English, we can try to help you :)
16.11.2022 - 13:46Buenos dias, me gustaria saber si me pueden ayudar a realizar este modelo en agujas numero 7, o sea el doble de la que aparecen aqui, desde ya muchas gracias.
04.07.2022 - 16:01DROPS Design answered:
Hola Dolores, nosotros no hacemos patrones personalizados. El dibujo de trenza queda mejor con agujas más finas, por lo que la mayoría de nuestros modelos van a usar agujas de menos de 7. Puedes intentar hacer una muestra con aguja de 7mm, comparar con la tensión del patrón y ajustar las cuentas como se explica a continuación:https://www.garnstudio.com/lesson.php?id=25&cid=23.
04.07.2022 - 19:04Salve vorrei creare questo modello, consigliate di usare i ferri circolari ma io preferisco i ferri diritti, ma seguendo i diagrammi non capisco come lavorare i ferri a rovescio? Grazie per la vostra risposta
07.01.2022 - 03:23DROPS Design answered:
Buonasera Annamaria, questo modello è lavorato in piano con i ferri circolari, quindi può seguire le stesse spiegazioni anche utilizzando i ferri dritti. Buon lavoro!
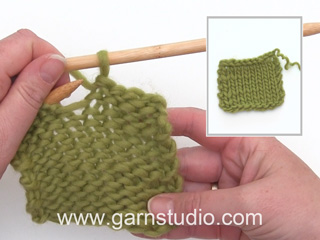
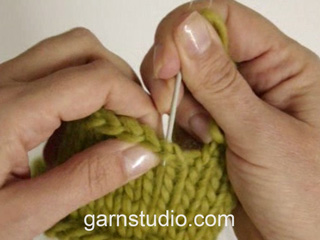
07.01.2022 - 16:47In het patroon staat:" 1 recht onder de volgende steek". Ik snap niet wat ik moet doen. Kunt u dat uitleggen
21.11.2021 - 13:46DROPS Design answered:
Dag Marianne,
Je steekt dan de naald niet in de volgende steek op de linker naald, maar in de steek die 1 rij daaronder zit. In onderstaande video kun je zien hoe dat precies in zijn werk gaat.
23.11.2021 - 10:59Buongiorno per lavorare questo modello in circolare e non avanti e indietro. cosa bisogna fare per adattare lo schema? Grazie
19.09.2021 - 16:12DROPS Design answered:
Buongiorno Daniela, questo modello è stato progettato per la lavorazione in piano anche per dare una struttura maggiore al capo: se volesse lavorarlo in tondo, deve togliere le maglie di vivagno e riadattare la lavorazione dei motivi alla lavorazione in tondo. Buon lavoro!
20.09.2021 - 09:26Bonjour, La stature de mon cousin est de 157 cm. Pensez-vous que la taille S correspondrait pour lui ? D'avance merci.
23.03.2021 - 07:48DROPS Design answered:
Bonjour Mme Martin, l'idéal est de mesurer un pull qu'il a et dont il aime la forme et de comparer ces mesures avec celles du schéma; vous trouverez ainsi plus facilement la bonne taille. Retrouvez plus d'infos sur les tailles et les schémas ici. Bon tricot!
23.03.2021 - 08:26