
Popular categories
Looking for a yarn?


|
|||||||||||||||||||||||||||||||||||||||||||
Hokey Pokey |
|||||||||||||||||||||||||||||||||||||||||||
 |
 |
||||||||||||||||||||||||||||||||||||||||||
Set consists of: Knitted DROPS mittens and toe-up socks with Nordic pattern, Latvian braid and pompoms in ”Karisma”.
DROPS 173-42 |
|||||||||||||||||||||||||||||||||||||||||||
|
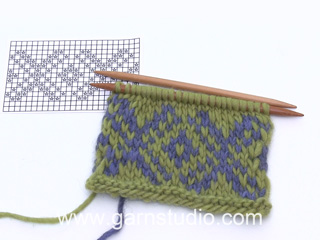
MITTENS: MAGIC CIRCLE: To avoid hole in the middle beg with this technique: Hold yarn end in the left hand and make a loop around left index finger (from left to right). Hold the loop with left thumb and index finger. Insert needle through loop, get yarn from ball (i.e. place yarn 1 time over needle from you), pull yarn back through loop, 1 YO (now place yarn from the back and towards you) and pull YO through sts on needle, * insert needle through loop, 1 YO (place yarn from the back and towards you), pull YO through loop, 1 YO (from the back and towards you) and pull YO through outermost st on right needle (i.e. the last st made) *, repeat from *-* until there are 12 sts on needle. Distribute sts on 4 double pointed needles size 3 mm / US 2.5 as explained in pattern. Then work as explained in pattern – AT THE SAME TIME pull yarn end so that loop is tighten tog and the hole disappears. PATTERN: See diagrams A.1 to A.3. Work entire pattern in stockinette st. LATVIAN BRAID: Braid consists of 3 rounds - all rounds are shown in diagram and worked as follows: ROUND 1: * K 1 with off white, K 1 with coral *, repeat from *-* the entire round. ROUND 2: Place both strands in the front of piece (towards you). Then move the off white strand to the back, P 1 and move the strand to the front again. Pull the coral strand underneath the off white strand and then move the coral to the back, P 1 and move the strand to the front again. Continue like this with P alternately with off white and coral but always place the strand underneath the strand from the last st worked. ROUND 3: Work as 2nd round but now place strand always OVER strand from the last st worked. ---------------------------------------------------------- LEFT MITTEN: Worked in the round on double pointed needles and work from fingertip to wrist. Start with mustard and MAGIC CIRCLE - see explanation above = 12 sts distributed on 4 double pointed needles 3 mm - NOTE: If you do not want to start with a magic circle cast on 12 sts with mustard distributed over 4 double pointed needles size 3 mm / US 2.5 (when mitten is done baste a yarn up and down through sts around hole at the top and tighten tog). Then work pattern in the round according to diagram A.1 and inc as shown in diagram = 52 sts on needle. REMEMBER THE KNITTING GAUGE When piece measures 12 cm / 4¾" from the tip (i.e. after round marked with arrow in diagram), bind off 3 sts over the 3 black squares in diagram for thumb opening (try the mitten and work to desired length). On next round: cast on 13 new sts over these = 62 sts on needle. NOTE: cast on as if working first row of diagram A.2, ie: cast on with 2 colors. See black star in diagram. Continue A.2 over these 13 sts, and A.1 as over the remaining sts. . When A.2 has been worked, there are 52 sts on needle and continue A.1 in the round over all sts again. When A.1 has been worked, loosely bind off with coral. The entire mitten measures approx. 24 cm / 9½". THUMB: Pick up 1 st in each of the 13 sts cast on for thumb opening and pick in addition up 9 sts around thumb opening = 22 sts. Distribute sts on double pointed needles size 3 mm / US 2.5 and work pattern in the round according to diagram A.3. Dec as shown in diagram. When A.3 has been worked, 8 sts remain on needle. Cut the yarns and pull them through the remaining sts, tighten tog and fasten. POMPOM: Make 1 small pompom with coral with an approx. diameter of 3 cm / 1". When tying the yarn around the pompom leave approx. 20 cm / 8" of yarn at the end. Now use the yarn ends and make knots after each other in a row until this tie is approx. 3 cm / 1". Then fasten tie with pompom in the side on mitten (see picture). There should be 2 pompom with ties in the side on mitten. RIGHT MITTEN: Cast on and work as left mitten but reversed, i.e. the 3 black squares for thumb are worked in 2nd, 3rd and 4th st from the left in the diagram. ---------------------------------------------------------- SOCKS: PATTERN: See diagrams A.4 to A.8 – choose diagram for correct size. INCREASE TIP: Inc 1 st by making 1 YO, on next round work YO twisted to avoid holes. HEEL: ROW 1 (= RS): Work until 10-10-11 sts remain, slip 1 st as if to K, K 1, psso, turn piece. ROW 2 (= WS): Work until 10-10-11 sts remain, slip 1 st as if to P, P 1, psso, turn piece. ROW 3 (= RS): Work until 9-9-10 sts remain, slip 1 st as if to K, K 1, psso, turn piece. ROW 4 (= WS): Work until 9-9-10 sts remain, slip 1 st as if to P, P 1, psso, turn piece. Continue dec like this with 1 less st before each dec until there are 17-17-19 sts on needle. LATVIAN BRAID: Braid consists of 3 rounds - all rounds are shown in diagram and worked as follows: ROUND 1: * K 1 with off white, K 1 with coral *, repeat from *-* the entire round. ROUND 2: Place both strands in the front of piece (towards you). Then move the off white strand to the back, P 1 and move the strand to the front again. Pull the coral strand underneath the off white strand and then move the coral to the back, P 1 and move the strand to the front again. Continue like this with P alternately with off white and coral but always place the strand underneath the strand from the last st worked. ROUND 3: Work as 2nd round but now place strand always OVER strand from the last st worked. ---------------------------------------------------------- SOCK: Worked in the round on double pointed needles and work from the toes and up. Cast on 12 sts on double pointed needles size 3.5 mm / US 4 with off white. Work pattern in the round according to diagram A.4 and inc as shown in diagram = 48 sts on needle. REMEMBER THE KNITTING GAUGE When A.4 is done, continue pattern in the round according to diagram A.5A. When piece measures 15-17-18 cm / 6"-6 3/4-7" from toe (approx. 7-7-9 cm / 2¾"-2¾"-3½" remain until full foot length – try the sock and work to desired length) insert 1 marker in 1st st on round and 1 marker in 25th st on round (both markers are in a mustard st on sock). Now inc 1 st before first marker and 1 st after 2nd marker - READ INCREASE TIP (= 2 sts inc). Inc like this every other round a total of 6-6-8 times = 60-60-64 sts on needle –NOTE: Work the inc sts in stripes under foot. After last inc keep the first 25 sts on needle and continue with stripes back and forth according to diagram A.6 over the remaining 35-35-39 sts for 3½-3½-4 cm / 1¼"-1¼"-1½" (sock measures 22-24-27 cm / 8¾"-9½"-10½" from the toe). Then work HEEL - see explanation above, over the 35-35-39 sts (continue stripes in A.6 as before). After heel work next round as follows: Work with off white over the 17-17-19 sts on heel, pick up 8-8-9 sts (with off white) along edge on the 3½-3½-4 cm / 1¼"-1¼"-1½" worked back and forth, continue A.5A over the next 25 sts and pick up 8-8-9 sts along edge on the 3½-3½-4 cm / 1¼"-1¼"-1½" in the other side = 58-58-62 sts on needle. Insert 1 marker, NOW MEASURE PIECE FROM HERE! Work next round as follows: Work pattern according to diagram A.7A over the first 33-33-37 sts (= behind sock) and dec AT THE SAME TIME 4-4-6 sts evenly over these sts on first round, so that pattern continues over 29-29-31 sts, continue A.5A as before over the next 25 sts (= at the front of sock) = 54-54-56 sts on needle. When A.7A has been worked one time vertically, repeat A.7B over these 29-29-31 sts (continue A.5A as before at the front of sock). AT THE SAME TIME when piece measures 4 cm / 1½", inc 1 st inside outermost st in each side of A.7B - READ INCREASE TIP (= 2 sts inc). Inc like this every 4 cm / 1½" a total of 3 times = 60-60-62 sts - NOTE: Work the inc sts in A.7B but the outermost 1-1-2 sts in each side should always be in off white. When piece measures approx. 13-14-15 cm / 5"-5½"-6" from marker – adjust after one whole repetition in A.5A and finish as shown on last round in A.5B K 1 round over all sts with off white. Then continue pattern in the round according to diagram A.8. AT THE SAME TIME on round marked with arrow inc 4-4-6 sts evenly = 64-64-68 sts. When A.8 has been worked, loosely bind off with coral. Sock measures approx. 19-20-21 cm / 7½-8"-8¼" from marker. ASSEMBLY: Sew opening at the front of toe tog with grafting/kitchener sts in mustard. Knit another sock the same way. |
|||||||||||||||||||||||||||||||||||||||||||
Diagram explanations |
|||||||||||||||||||||||||||||||||||||||||||
|
|||||||||||||||||||||||||||||||||||||||||||

|
|||||||||||||||||||||||||||||||||||||||||||

|
|||||||||||||||||||||||||||||||||||||||||||

|
|||||||||||||||||||||||||||||||||||||||||||

|
|||||||||||||||||||||||||||||||||||||||||||
|
Have you made this or any other of our designs? Tag your pictures in social media with #dropsdesign so we can see them! Do you need help with this pattern?You'll find tutorial videos, a Comments/Questions area and more by visiting the pattern on garnstudio.com. © 1982-2024 DROPS Design A/S. We reserve all rights. This document, including all its sub-sections, has copyrights. Read more about what you can do with our patterns at the bottom of each pattern on our site. |
|||||||||||||||||||||||||||||||||||||||||||


With over 40 years in knitting and crochet design, DROPS Design offers one of the most extensive collections of free patterns on the internet - translated to 17 languages. As of today we count 304 catalogs and 11422 patterns - 11417 of which are translated into English (US/in).
We work hard to bring you the best knitting and crochet have to offer, inspiration and advice as well as great quality yarns at incredible prices! Would you like to use our patterns for other than personal use? You can read what you are allowed to do in the Copyright text at the bottom of all our patterns. Happy crafting!
Comments / Questions (38)
Mangler en vidio med hvordan man starter op på disse vanter. Har købt masse af garn m.m. Fandt en vidio med strikket magisk cirkel på YouTube. Med kan ikke finde hvordan man følger et diagram hvor der bliver lavet laver udtagning og farveskift. Kan godt strikke vanter op fra og ned. Kan også følge et diagram uden ind og udtagning. Håber på hurtig hjælp, please.
08.08.2023 - 14:45DROPS Design answered:
Hej Helle, du starter på selve vanten der hvor der står VENSTRE VANTE med at slå 12 masker op på 4 strømpepinde (du behøver ikke starte med magisk cirkel) og så strikker du rundt ifølge diagram A.1 og nu er det bare at følge diagrammet, her er også udtagningerne tegnet ind :)
16.08.2023 - 10:20Bonjour, je me lance pour la première fois dans la confection de moufles et je ne comprends pas comment faire pour tricoter le pouce. J'ai cherché un tuto en vain (celui que j'ai trouvé correspond à la moufle que l'on tricote à partir du bas et non par la pointe). Je ne sais à quel moment tricoter les 13 mailles de A2 et sur quoi relever les 9 mailles supplémentaires. Merci beaucoup Marion
21.02.2023 - 15:52DROPS Design answered:
Bonjour Mme Soidriddine, pour tricoter le pouce, relevez 1 maille dans chacune des 13 mailles montées en faisant la moufle + 9 mailles autour de l'ouverture du pouce (= les 3 mailles rabattues + de chaque côté de ces 3 mailles). Bon tricot!
21.02.2023 - 18:12Mitaines : Dans votre document PDF en français, la Légende diagramme(s) est incomplète. Il faut se référer sur le site en ligne pour avoir la description complète. Mittens: In your PDF document in French, the Legend diagram(s) is incomplete. You must refer to the online site for the complete description.
19.11.2022 - 16:26Mitaine - Pouce Je crois que vous devriez ajouter la phrase suivante au tout début du paragraphe pour le pouce : 'EN PARTANT DE LA PREMIÈRE MAILLE DES 13 MAILLES RELEVÉES AUPARAVANT, relever 1 m dans chacune des 13 m montées pour l'ouverture du pouce et relever en plus 9 m autour de l'ouverture =22 m.
18.11.2022 - 18:40Har diagram A-2 falt ut av oppskriften? Jeg har strikket en vott, da lå A-2 inne. Nå finner jeg det ikke.
26.07.2022 - 17:57DROPS Design answered:
Hej Ingrid, A.2 ligger nedenfor A.1 :)
04.08.2022 - 08:25Det här stämmer inte: \"Nästa v stickas så här: Sticka mönster efter diag A.7A över de första 33-33-37 m (= bak på sockan)\". Jag har redan stickat de första 8 enligt beskrivningen eller menas det att de åtta man plockar upp inte ska stickas innan? Väldigt otydligt. Ska jag sticka runt ett helt varv ifrån var jag är efter de 8 upptagna och sen börja mönstret? Ska jag backa? Skulle jag inte stickat de 8 upptagna maskorna? Eller ska jag börja mitt i mönstret?
17.01.2022 - 22:45Wanten - probleem. Geacht team, moeten er na het afkanten van de 3 steken direct 13 steken extra opzetten of moet je eerst een ronde doorbreien en dan pas de 13 steken opzetten? Ik zie graag uw reactie.
19.12.2021 - 12:21DROPS Design answered:
Dag Marijke,
Na het afkanten brei je de naald verder in patroon en op de volgende naald zet je 13 nieuwe steken op boven de 3 afgekante steken.
19.12.2021 - 19:03Over wanten een vraag die hier al eerder is gesteld maar niet duidelijk werd beantwoord! Als de 3 steken zijn afgekant , wordt er dan eerst doorgewerkt in A 1 en bij de volgende ronde op deze plek de opzet van 13 steken gedaan?
19.12.2021 - 12:10Dear all. You can finish these socks by making a purl row after the last braid and then continuing with stockinette with smaller needles for some rows before casting off. Fold the stockinette inside the sock and either sew loosely , joining to the lower braid or simply sew/attach down the sides. It makes a lovely and pristine top edge. Better still is to decrease by 2 stitches on the purl row, as well as using a half size smaller needles.
21.07.2021 - 10:09Hi! the pattern describes (= recht met koraal ) 'knit with coral' twice. When looking at the english page the second was 'purl with coral', which might need to be corrected :) Also, when doing the last row of the mittens, do you cast off with purl stitches? or knit?
17.02.2021 - 09:11DROPS Design answered:
Dear Sue, thanks for noticing, diagram text has been now updated in dutch - you can cast off with knit stitches at the end of the mittens - just make sure cast off edge is not too tight. happy knitting!
17.02.2021 - 14:40