The yarn cost is calculated from the pattern’s smallest size and the yarn’s cheapest product type. Looking for an even better price? You might find it on the DROPS Deals!
-------------------------------------------------------
Alternative Yarn – See how to change yarns here
Yarn Groups A to F – Use the same pattern and change the yarn here
Yarn usage using an alternative yarn – Use our yarn converter here
-------------------------------------------------------
The yarn cost is calculated from the pattern’s smallest size and the yarn’s cheapest product type. Looking for an even better price? You might find it on the DROPS Deals!
This pattern has been corrected. Click here to see the correction/s.
All measurements in charts are in cm.
= K from RS, P from WS | |
= P from RS, K from WS | |
= 1 YO between 2 sts, work YO twisted on next round/row | |
= 1 YO between 2 sts, DO NOT K YO twisted on next round/row, it should make hole | |
= slip 1 st as if to K, K 2, psso. | |
= no stitch, skip this square | |
= Cable: Slip 3 sts on cable needle behind piece, K 3, K 3 from cable needle | |
= Cable: Slip 3 sts on cable needle in front of piece, K 3, K 3 from cable needle | |
= work A.1 here |
Each of our patterns has specific tutorial videos to help you.
These step-by-step tutorials might also help you:
Why is the knitting/crochet tension so important?
Knitting tension is what determines the final measurements of your work, and is usually measured per 10 x 10 cm. It is provided like so: number of stitches in width x number of rows in height - eg: 19 stitches x 26 rows = 10 x 10 cm.
The knitting tension is very individual; some people knit/crochet loosely while others work tightly. You adjust the knitting tension with the needle size, which is why the suggested needle size only serve as a guide! You need to adjust this (up or down) to ensure that YOUR knitting tension matches the knitting tension provided in the pattern. If you work with a different knitting tension than provided you will have a different yarn consumption, and your work will have different measurements than what the pattern suggests.
The knitting tension also determines which yarns can replace each other. As long as you achieve the same knitting tension you can replace one yarn with another.
See DROPS lesson: How to measure your tension/gauge
See DROPS video: How to make a gauge tension swatch
How do I know how many balls of yarn I need?
The required amount of yarn is provided in grams, eg: 450 g. To calculate how many balls you’ll need you first need to know how many grams are in 1 ball (25g, 50g or 100g). This information is available if you click on the individual yarn quality on our pages. Divide the amount required with the amount of each ball. For example, if each ball is 50g (the most common amount), the calculation will be as follows: 450 / 50 = 9 balls.
Can I use a different yarn than what the pattern suggests?
The important thing when changing from one yarn to another is that the knitting/crochet tension remains the same. This is so that the measurements of the finished piece will be the same as on the sketch provided. It is easier to achieve the same knitting tension using yarns from the same yarn group. It is also possible to work with multiple strands of a thinner yarn to achieve the knitting tension of a thicker one. Please try our yarn converter. We recommend you to always work a test swatch.
Please NOTE: when changing yarn the garment might have a different look and feel to the garment in the photo, due to individual properties and qualities of each yarn.
See DROPS lesson: Can I use a different yarn than the one mentioned in the pattern?
What are the yarn groups?
All our yarns are categorised into yarn groups (from A to F) according to thickness and knitting tension – group A contains the thinnest yarns and group F the thickest. This makes it easier for you to find alternative yarns to our patterns, should you wish to switch yarn. All yarns within the same group have a similar knitting tension and can easily replace each other. However, different yarn qualities have different structures and properties which will give the finished work a unique look and feel.
How do I use the yarn converter?
At the top of all our patterns you’ll find a link to our yarn converter, which is a helpful tool should you wish to use a different yarn than suggested. By filling in the yarn quality you wish to replace, the amount (in your size) and number of strands, the converter will present good alternative yarns with the same knitting tension. Additionally it will tell you how much you’ll require in the new qualities and whether you’ll need to work with multiple strands. Most skeins are 50g (some are 25g or 100g).
If the pattern is worked with multiple colours, every colour will have to be converted separately. Similarly, if the pattern is worked with several strands of different yarns (for example 1 strand Alpaca and 1 strand Kid-Silk) you will have to find alternatives for each, individually.
Why do you show discontinued yarns in the patterns?
Since different yarns have different qualities and textures we have chosen to keep the original yarn in our patterns. However, you can easily find options among our available qualities by using our yarn converter, or simply pick a yarn from the same yarn group.
It is possible that some retailers still have discontinued yarns in stock, or that someone has a few skeins at home that they would like to find patterns for.
The yarn converter will provide both alternative yarn as well as required amount in the new quality.
What size should I knit?
If you think it's hard to decide what size to make, it can be a good idea to measure a garment you own already and like the size of. Then you can pick the size by comparing those measures with the ones available in the pattern's size chart.
You'll find the size chart at the bottom of the pattern.
See DROPS lesson: How to read size chart
Why do I get the wrong knitting tension with the suggested needle size?
The needle size provided in the pattern serves only as a guide, the important thing is to follow the knitting tension. And since knitting tension is very individual, you will have to adjust the needle size to ensure that YOUR tension is the same as in the pattern – maybe you’ll have to adjust 1, or even 2 needle sizes, up or down to achieve the correct tension. For this, we recommend that you work test swatches.
Should you work with a different knitting tension than the one provided, the measurements of the finished garment might deviate from the measurement sketch.
See DROPS lesson: How to measure your tension/gauge
See DROPS video: How to make a gauge tension swatch
Why is the pattern worked top-down?
Working a garment top-down provides more flexibility and room for personal adjustment. For example it is easier to try the garment on while working, as well as making adjustments to length of yoke and shoulder caps.
The instructions are carefully explaining every step, in the correct order. Diagrams are adjusted to the knitting direction and are worked as usual.
How do I work according to a knitting diagram?
The diagram depicts all rows/rounds, and every stitch seen from the right side. It is read from bottom to top, from right to left. 1 square = 1 stitch.
When working back and forth, every other row is worked from the right side and every other row is worked from the wrong side. When working from the wrong side, the diagram will have to be worked reversed: from left to right, knit stitches are purled, purl stitches are knit etc.
When working in the round every round is worked from the right side and the diagram are worked from right to left on all rounds.
See DROPS lesson: How to read knitting diagrams
How do I work according to a crochet diagram?
The diagram depicts all rows/rounds, and every stitch seen from the right side. It is worked from bottom to top, from right to left.
When working back and forth every other row is worked from the right side: from right to left and every other row is worked from the wrong side: from left to right.
When working in the round, every row in the diagram are worked from the right side, from right to left.
When working a circular diagram you start in the middle and work your way outwards, counter clockwise, row by row.
The rows usually start with a given number of chain stitches (equivalent to the height of the following stitch), this will either be depicted in the diagram or explained in the pattern.
See DROPS lesson: How to read crochet diagrams
How do I work several diagrams simultaneously on the same row/round?
Instructions for working several diagrams after each other on the same row/round, will often be written like so: “work A.1, A.2, A.3 a total of 0-0-2-3-4 times". This means you work A.1 once, then A.2 is worked once, and A.3 is repeated (in width) the number of times provided for your size – in this case like so: S = 0 times, M = 0 times, L=2 times, XL= 3 times and XXL = 4 times.
The diagrams are worked as usual: begin with the first row in A.1, then work the first row in A.2 etc.
See DROPS lesson: How to read knitting diagrams
See DROPS lesson: How to read crochet diagrams
Why are the sleeves shorter in larger sizes?
The total width of the garment (from wrist-to-wrist) will be larger in the larger sizes, despite the actual sleeves being shorter. The larger sizes have longer sleeve caps and wider shoulders, so there will be a good fit in all sizes.
Where on the garment is the length measured?
The measurement sketch/schematic drawing provides information regarding the full length of the garment. If it’s a jumper or a jacket the length is measured from the highest point on the shoulder (usually closest to the neckline), and straight down to the bottom of the garment. It is NOT measured from the tip of shoulder. Similarly, the length of yoke is measured from the highest point on the shoulder and down to where yoke is split into body and sleeves.
See DROPS lesson: How to read a schematic drawing
What is a repeat?
Diagrams are often repeated on the round or in height. 1 repeat is the diagram the way it appears in the pattern. If it says to work 5 repeats of A.1 in the round, then you work A.1 a total of 5 times after/next to each other in the round. If it says to work 2 repeats of A.1 vertically/in height you work the entire diagram once, then begin again at the start and work the entire diagram one more time.
Why does the piece start with more chain stitches than it’s worked with?
Chain stitches are slightly narrower than other stitches and to avoid working the cast-on edge too tight, we simply chain more stitches to begin with. The stitch count will be adjusted on the following row to fit the pattern and measurement sketch.
Why increase before the rib edge when the piece is worked top-down?
The rib edge is more elastic and will contract slightly compared to, for example, stocking stitch. By increasing before the rib edge, you avoid a visible difference in width between the rib edge and the rest of the body.
Why increase in the cast-off edge?
It’s very easy to cast off too tightly, and by making yarn overs while casting off (and simultaneously casting these off) you avoid a too tight cast off edge.
See DROPS video: How to bind off with yarn overs (yo)
How do I increase/decrease on every 3rd and 4th row/round alternately?
To achieve an even increase (or decrease) you can increase on, for example: every 3rd and 4th row alternately, like so: work 2 rows and increase on the 3rd row, work 3 rows and increase on the 4th. Repeat this until the increase is complete.
See DROPS lesson: Increase or decrease 1 st on every 3rd and 4th row alternately
How can I work a jacket in the round instead of back and forth?
Should you prefer to work in the round instead of back and forth, you may of course adjust the pattern. You’ll need to add steeks mid-front (usually 5 stitches), and follow the instructions. When you would normally turn and work from the wrong side, simply work across the steek and continue in the round. At the end you’ll cut the piece open, pick up stitches to work bands, and cover the cut edges.
See DROPS video: How to knit steeks and cut open
Can I work a jumper back and forth instead of in the round?
Should you prefer to work back and forth instead of in the round, you may of course adjust the pattern so you work the pieces separately and then assemble them at the end. Divide the stitches for the body in 2, add 1 edge stitch in each side (for sewing) and work the front and back pieces separately.
See DROPS lesson: Can I adapt a pattern for circular needles into straight needles?
Why is the pattern slightly different than what I see in the photo?
Pattern repeats can vary slightly in the different sizes, in order to get the correct proportions. If you’re not working the exact same size as the garment in the photo, yours might deviate slightly. This has been carefully developed and adjusted so that the complete impression of the garment is the same in all sizes.
Make sure to follow instructions and diagrams for your size!
How do I make a women’s size garment into a men’s size one?
If you have found a pattern you like which is available in women’s size it’s not very difficult to convert it to men’s size. The biggest difference will be the length of sleeves and body. Start working on the women size that you think would fit across the chest. The additional length will be worked right before you cast off for the armhole/sleeve cap. If the pattern is worked top-down you can add the length right after the armhole or before the first decrease on sleeve.
Regarding additional yarn amount, this will depend on how much length you add, but it is better with a skein too many than too few.
How do I prevent a hairy garment from shedding?
All yarns will have excess fibres (from production) that might come off as lint or shedding. Brushed yarns (ie hairier yarns) have more of these loose, excess fibres, causing more shedding.
Shedding also depends on what is worn under or over the garment, and whether this pulls at the yarn fibres. It’s therefore not possible to guarantee that there will be no shedding
Below are some tips on how to get the best result when working with hairier yarns:
1. When the garment is finished (before you wash it) shake it vigorously so the looser hairs come off. NOTE: do NOT use a lint roller, brush or any method that pulls at the yarn.
2. Place the garment in a plastic bag and put it in your freezer - the temperature will cause the fibres to become less attached to each other, and excess fibres will come off easier.
3. Leave in the freezer for a few hours before taking it out and shaking it again.
4. Wash the garment according to the instructions on the yarn label.
Why does my garment pill?
Pilling is a natural process that happens to even the most exclusive of fibers. It's a natural sign of wear and tear that is hard to avoid, and that is most visible in high friction areas of your garment like a sweater's arms and cuffs.
You can make your garment look as new by removing the pilling, using a fabric comb or a pill/lint remover.
Sand Tracks |
||||||||||||||||||||||||||||
|
||||||||||||||||||||||||||||
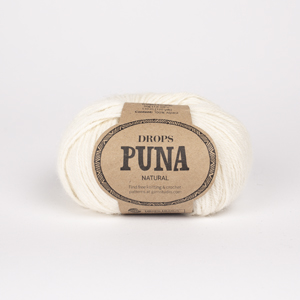
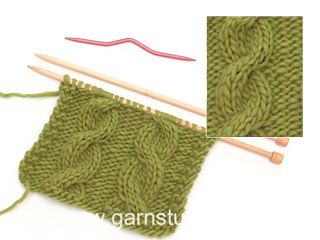
Knitted DROPS jumper worked in a circle with cables in ”Puna”. Size: S - XXXL.
DROPS 171-7 |
||||||||||||||||||||||||||||
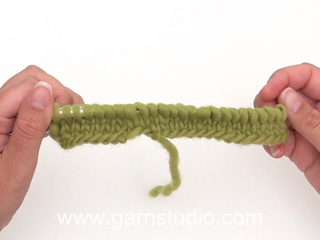
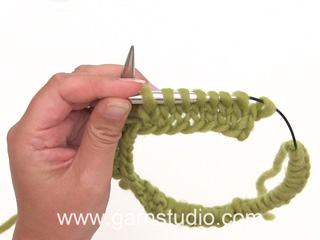
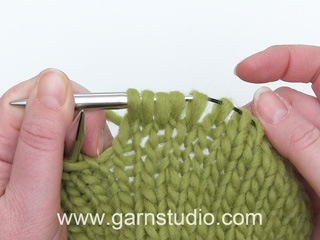
PATTERN: See diagram A.1. Diagram A.1a has 12 rows cable and lace pattern and 10 rows stockinette st with inc that are repeated vertically. INCREASE TIP: Inc 1 st in every P section as follows: K 3, inc 1 st by getting yarn between 2 sts and P this twisted (i.e. work in back loop of st instead of front) to avoid holes. Next inc in every P section is done straight before 3 K sts so that inc are alternately on left and right side of every P section. BUTTONHOLES: Dec for buttonhole in next to last P section in each side of piece on edge on front piece when edge measures approx. 3 cm / 1''. Work P section as follows from RS: P 1, P 2 tog, 1 YO, P 1. ---------------------------------------------------------- BACK PIECE: Worked in the round in a circle from mid back. Cast on 6 sts with Puna and distribute them on 4 double pointed needles size 4.5 mm / US 7. * K 1, 1 YO *, repeat from *-* the entire round = 12 sts. Work A.1 (= 2 sts) 6 times in width in total. REMEMBER THE KNITTING GAUGE When A.1 (includes A.1a) has been worked 1 time vertically, there are 300 sts on needle. Repeat pattern and inc in A.1a. Continue like this until piece measures 56-60-64-66-68-70 cm / 22"-23½"-25 1/4"-26"-26 3/4"-27½" in diameter (= approx. 420-444-468-480-492-504 sts on needle). Adjust so that next round is 1 round with YOs. Cut the yarn. Insert 1 marker in piece, NOW MEASURE PIECE FROM HERE. Now work piece back and forth, beg from RS as follows: Displace row so that it beg in the middle of 2 cables (= i.e. after first cable and 2 P sts), work pattern, stockinette st and inc as before over 6 cables in total = 3 sections with stockinette st (= approx.. 208-220-232-238-244-250 sts), turn and work back when last cable has been worked (i.e. row beg with 1 cable and end with 1 cable, there is no edge st). Slip the remaining sts on a stitch holder (= approx. 212-224-236-242-248-254 sts = edge at the bottom of jumper), work rib over these sts later. Continue over the 6 cables and the 3 sections with stockinette st as follows: Insert 1 marker in the middle of the 2nd section in stockinette st (i.e. there are 3 cables on each side of marker = middle of row). Continue pattern and inc as before (i.e. inc 6 sts on every inc row). When piece measures 11-11-12-12-13-13 cm / 4 3/8''-4 3/8''-4¾''-4¾''-5 1/8''-5 1/8'' from marker (adjust so that next row is from RS), dec for neck and finish each shoulder separately. Work as before until 17-17-18-18-19-19 sts remain before marker (the middle of the 2nd section in stockinette st), slip the next 34-34-36-36-38-38 sts (marker is in the middle of these sts) on a stitch holder for neck, turn and work back. 10 rows remain until finished measurement. On next row from neck bind off 1 st for neck. Continue pattern, stockinette st and inc. When the 10 rows have been worked, piece measures approx. 15-15-16-16-17-17 cm / 6"-6"-6 1/4"-6 1/4"-6 3/4"-6 3/4" from marker. Slip the remaining sts on a stitch holder. Work the other shoulder the same way but reversed. Piece measures approx. 86-90-96-98-102-104 cm / 34"-35½"-37 3/4"-38½"-40"-41" in diameter on the longest part, from side to side (= 36-36-38-38-40-40 sts in total slipped on a stitch holder/bind off for neck). EDGE: Work rib over sts slipped on a stitch holder at the bottom of piece. Slip sts on to circular needle size 3.5 mm / US 4 = approx. 212-224-236-242-248-254 sts. Work back and forth. P 1 row from WS and inc approx. 91 sts (adjust no so that it is divisible by 6 sts + 3 sts) = approx. 303-315-327-333-339-345 sts. Work rib (= K 3/P 3), beg from RS, until 3 sts remain, finish with K 3. When rib measures approx. 1½.cm, inc 1 P st in every P section seen from RS – READ INCREASE TIP – (= approx. 50-52-54-55-56-57 sts inc) = approx. 353-367-381-388-395-402 sts. Then work rib K 3/P 4 seen from RS. Repeat inc when piece measures 3½ cm / 1 1/4" (approx. 50-52-54-55-56-57 sts inc = approx. 403-419-435-443-451-459 sts). Then work rib K 3/P 5 seen from RS. Bind off with K over K and P over P when rib measures approx. 5 cm / 2''. Piece measures approx. 76-80-85-88-91-93 cm / 30"-31½"-33½"-34½"-35 3/4"-36½" in diameter vertically. FRONT PIECE: Cast on and work as back piece until 22-22-24-24-26-26 rows remain (= approx. 8-8-9-9-10-10 sts) to where shoulder sts where slipped on a stitch holder. (This is important to get same no of shoulder sts on front and back piece = same no of inc). Next row is from RS of piece. Now dec for neck and finish each shoulder separately. Work as before until 8 sts remain before marker (the middle of the 2nd section in stockinette st), slip the next 16 sts (marker is in the middle of these sts) on a stitch holder for neck, turn and work back. On next row from neck bind off 1 st for neck. Bind off like this on every row from neck 10-10-11-11-12-12 times in total (= 26-26-27-27-28-28 sts in total slipped on stitch holder/bind off for neck). Continue over shoulder sts until shoulder has the same length as on back piece. Slip sts on stitch holder. Work the other shoulder the same way (= 36-36-38-38-40-40 sts in total slipped on stitch holder/bound off for neck). EDGE: Work as back piece but dec for BUTTONHOLES - see explanation above. ASSEMBLY: Sew shoulder seams with grafting/Kitchener st. Sew button on edge on back piece. NECK EDGE: Worked in the round, beg mid back. Pick up 119-119-126-126-133-133 sts on double pointed needles size 3.5 mm / US 4 (includes sts on stitch holders). Work rib (= P 4/K 3). When neck edge measures 2 cm / 3/4'', dec 1 st in every P-section by P the first 2 P sts tog = 102-102-108-108-114-114 sts. Then work rib (= P 3/K 3). When neck edge measures 5 cm / 2'', bind off with K over K and P over P. |
||||||||||||||||||||||||||||
Diagram explanations |
||||||||||||||||||||||||||||
|
||||||||||||||||||||||||||||
Have you made this or any other of our designs? Tag your pictures in social media with #dropsdesign so we can see them! Do you need help with this pattern?You'll find tutorial videos, a Comments/Questions area and more by visiting the pattern on garnstudio.com. © 1982-2024 DROPS Design A/S. We reserve all rights. This document, including all its sub-sections, has copyrights. Read more about what you can do with our patterns at the bottom of each pattern on our site. |
With over 40 years in knitting and crochet design, DROPS Design offers one of the most extensive collections of free patterns on the internet - translated to 17 languages. As of today we count 304 catalogs and 11422 patterns - 11417 of which are translated into English (US/in).
We work hard to bring you the best knitting and crochet have to offer, inspiration and advice as well as great quality yarns at incredible prices! Would you like to use our patterns for other than personal use? You can read what you are allowed to do in the Copyright text at the bottom of all our patterns. Happy crafting!
Comments / Questions (17)
Elfrieda Schouwenburg wrote:
Hoe maak ik het voorpand? Ik snap de eerste paragraaf van de omschrijving niet
08.11.2023 - 22:24DROPS Design answered:
Het voorpand brei je eerst hetzelfde als het achterpand en als het op 22-22-24-24-26-26 naalden ten opzichte van het achterpand klaar is, volg je de instructies voor het voorpand.
13.11.2023 - 06:28Elfrieda Schouwenburg wrote:
Ik snap niet hoe ik het voorpand moet maken. In het achterpand wordt gewerkt met centimeters niet met aantallen naalden
08.11.2023 - 21:44Francine Ouellet wrote:
Bonjour, J’aimerais m’assurer que j’ai bien compris : lorsque je répète À.1a, il y a un endroit où il y a 4 rangs consécutifs sans jeté d’augmentation, soit les 4 rangs du haut du croquis. C’est bien ça? Merci à l’avance
20.03.2022 - 20:18DROPS Design answered:
Bonjour Mme Ouellet, pas exactement, lorsque vous répétez A.1a, continuez à augmenter de part et d'autre des torsades, mais continuez vos torsades en hauteur au même rythme qu'avant, autrement dit répétez les torsade ajourées comme avant et croisez les mailles des torsades tous les 6 mailles comme avant, elles ne se feront pas aux mêmes rangs que les augmentations. Bon tricot!
21.03.2022 - 08:50Yrsa Nielsen wrote:
Jeg er kørte fast i den, jeg er kommet til hvor jeg ca. 468m og 64cm. Nu forstår jeg ikke lige hvad jeg så skal, for at komme videre i den.
19.01.2022 - 16:10DROPS Design answered:
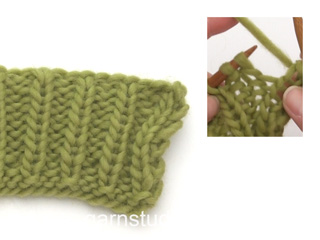
Hej Yrsa, nu klipper du tråden, sætter et mærke og går ned til næste afsnit. Nu strikker du frem og tilbage over det øverste stykke, du ser på billedet at du starter og slutter imellem de 2 snoninger i hver side. God fornøjelse!
21.01.2022 - 09:07Natalia wrote:
Hi , please help , What happens to stockinette stitches on the last 2 rows of diagram A 1a? Do I go back to the beginning of A 1a for them ? Thank you .
14.11.2020 - 18:28DROPS Design answered:
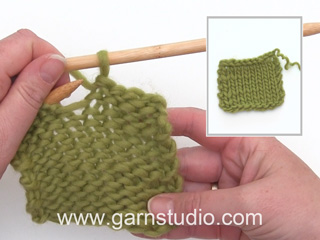
Dear Natalia, when you have worked to the last row in stocking stitch in A.1a, the cable pattern is not down in height, repeat the stocking stitch from the row shown with the frame A.1a and continue the cable pattern in the middle as next row in diagram, and so on, ie the middle repeat will be worked over a different number of rows as the stocking section on each side. Make sure to work the lace cables as before and that there are always the same number of rows between the cables in the middle. Happy knitting!
16.11.2020 - 08:34Liliana wrote:
Hallo, dar Pulli ist wunderschön und würde den so gerne stricken, habe aber noch nie in Kreis gestrickt und weiß nicht wie ich anfangen soll. Haben Sie vielleicht ein Video wo man sehen kann wie es geht? Ich bedanke mich herzlich für Ihre Antwort.
02.11.2019 - 19:34DROPS Design answered:
Liebe Liliana! 6 M mit Puna anschlagen und auf 4 Nadeln des Nadelspiels Nr. 4,5 verteilen. Wie folgt in Rd str: * 1 M re, 1 Umschlag *, von *-* bis Rd-Ende wdh = 12 M. A.1 (= 2 M) insgesamt 6 x in der Breite str. Viel Spaß beim stricken!
02.11.2019 - 21:56Annette Kirchner wrote:
Guten Tag. Ich habe noch eine Frage. Wie soll ich den Zopf machen, wenn ich aus der Vorreihe noch einen Umschlag auf der Nadel habe ? A1 Rd. 19. Vielen Dank und schöne Grüße.
04.06.2017 - 10:54DROPS Design answered:
Liebe Frau Kirchner, der Umschlag wird dann mit dem Zopf rechts verschränkt gestrickt (= kein Loch muss entstehen), zB: 3 M auf die Zopfnadel hinter die Arb legen (= der Umschlag verschränkt stricken + 2 M). Viel Spaß beim stricken!
06.06.2017 - 08:52Annette Kirchner wrote:
Guten Tag, sind bei A1/a die Zwischenrunden mit eingezeichnet, oder muss ich die zusätzlich machen ?
26.05.2017 - 18:41DROPS Design answered:
Liebe Frau Kirchner, alle Runden sind im Diagram eingezeichnet, 1 Kästchen im Diagram = 1 M x 1 Runde. Viel Spaß beim stricken!
29.05.2017 - 08:45Nina wrote:
Dear Garnstudio team, have a question about section A1a (diagram A.1a has 12 rows cable and lace pattern and 10 rows stocking st with inc that are repeated vertically).Which method do you use when knitting 11,12th cable/lace pattern (as I understand right, you don't knit stocking stitch these 2 rounds)? Thank you for you answer and worm regards up to Norway;), Nina
14.09.2016 - 10:18DROPS Design answered:
Dear Nina, when working A.1, repeat cable every 6th round (= cross sts every 6th round, ie after 5 rounds stocking st) and repeat lace pattern every 4th round (= lace pattern is 4 rounds). Happy knitting!
14.09.2016 - 12:28Rosy wrote:
Modèle très original, il me tarde de pouvoir le tricoter !
18.06.2016 - 18:01