
Vinsælir flokkar
Ertu að leita að garni?


|
||||||||||||||||
Scent of Lilac Vest |
||||||||||||||||
 |
 |
|||||||||||||||
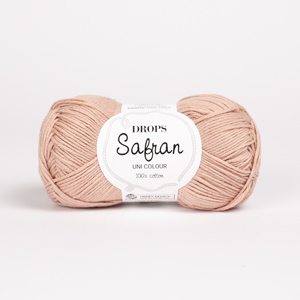
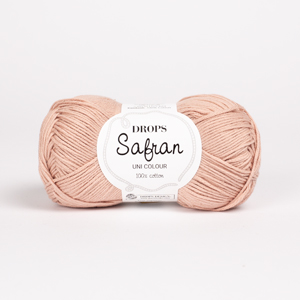
Heklaður toppur / bolur úr DROPS Safran. Stykkið er heklað ofan frá og niður í gatamynstri. Stærð S - XXXL.
DROPS 241-28 |
||||||||||||||||
|
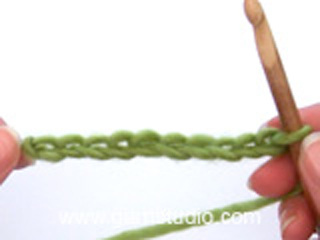
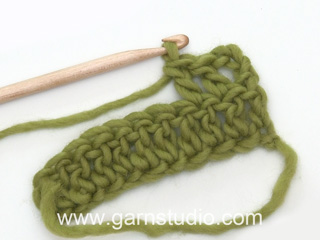
------------------------------------------------------- UPPLÝSINGAR FYRIR MYNSTUR: ------------------------------------------------------- HEKLLEIÐBEININGAR: Í byrjun á hverri umferð með stuðlum eru heklaðar 3 loftlykkjur, þessar loftlykkjur koma í stað fyrsta stuðul. LOFTLYKKJA: Ef þú heklar yst á heklunálinni þá kemur loftlykkjan oft til með að verða of stíf. 1 loftlykkja á að vera álíka löng og breiddin á 1 stuðli. MYNSTUR: Sjá mynsturteikningu A.1 til A.6. Veldu mynsturteikningu fyrir þína stærð í A.1. ------------------------------------------------------- BYRJIÐ Á STYKKI HÉR: ------------------------------------------------------- TOPPUR - STUTT ÚTSKÝRING Á STYKKI: Toppurinn er fyrst heklaður fram og til baka í stykkjum, ofan frá og niður, síðan eru stykkin sett saman og heklað er fram og til baka frá miðju að framan. BAKSTYKKI: Heklið 13-13-15-15-17-17 LOFTLYKKJA – sjá útskýringu að ofan, með heklunál 3 með DROPS Safran. Heklið 1 stuðul í 4. loftlykkju frá heklunálinni (2 stuðlar) – lesið HEKLLEIÐBEININGAR, 1 stuðul í hverja af næstu 9-9-11-11-13-13 loftlykkjum = 11-11-13-13-15-15 stuðlar. Heklið síðan A.1. Endurtakið 2 efstu umferðir í A.1 þar til stykkið mælist ca 7 cm, geymið stykkið og heklið annað band á öxl / hlýra á sama hátt. Síðan er heklað yfir bæði böndin á öxl / hlýra þannig: Heklið 1 stuðul í hverja af 11-11-13-13-15-15 lykkjum frá fyrra bandi / hlýra á öxl, heklið 43-47-51-55-63-67 loftlykkjur, heklið 1 stuðul í hverja af 11-11-13-13-15-15 lykkjum frá seinna bandi / hlýra á öxl = 65-69-77-81-93-97 lykkjur. Í næstu umferð er heklað þannig: Heklið A.2 yfir fyrstu 5 stuðla, heklið 1 stuðul í hvern stuðul og 1 stuðul í hverja loftlykkju þar til 5 stuðlar eru eftir, heklið A.2. Lestu allan næsta kafla, nú eru heklaðar 2 umferðir með mynstri, jafnframt því frá fyrstu umferð byrjar útaukning í hvorri hlið: Í 2 næstu umferðum er heklað A.3 yfir nýju stuðla í hálsmáli, A.2 yfir 5 ystu stuðla í hvorri hlið og 1 stuðul í hverja lykkju yfir þær lykkjur sem eftir eru. Þegar A.3 hefur verið heklað til loka, heklið 1 stuðul í hverja lykkju og A.2 í hvorri hlið. JAFNFRAMT frá fyrstu umferð í A.3 er aukið út um 1 stuðul í hvorri hlið, aukið út með því að hekla 2 stuðla í 1 stuðul, aukið er út í 5. lykkju inn frá hvorri hlið. Aukið út í hverri umferð alls 11-12-13-14-16-17 sinnum. Eftir alla útaukningu eru 87-93-103-109-125-131 lykkjur í umferð og stykkið mælist ca 17-18-19-19-21-22 cm. Endið með umferð frá röngu, klippið þráðinn. Geymið stykkið og heklið framstykkin. HÆGRA FRAMSTYKKI: Heklið 13-13-15-15-17-17 loftlykkjur með heklunál 3 og DROPS Safran. Heklið 1 stuðul í 4. loftlykkju frá heklunálinni (2 stuðlar), 1 stuðul í hverja af næstu 9-9-11-11-13-13 loftlykkjum = 11-11-13-13-15-15 stuðlar. Heklið síðan A.1. Haldið áfram þar til A.1 hefur verið heklað ca 7 cm. Nú á að auka út í hvorri hlið, ekki er aukið út alveg eins í byrjun og í lok umferðar. Haldið áfram með stuðla með A.2 yfir ystu 5 lykkjur í hvorri hlið og aukið út þannig: Aukið út um 1 stuðul að hlið og 2 stuðla við miðju að framan. Aukið er út í hverri umferð, aukið er út í 5. lykkju inn frá hlið (byrjun umferðar séð frá réttu) og í 5. og 6. stuðul frá miðju að framan (í lok umferðar séð frá réttu). Aukið út með því að hekla 2 stuðla í hvern stuðul. Aukið út í hverri umferð alls 11-12-13-14-16-17 sinnum (aukið út um 3 stuðla í hverri umferð). Eftir alla útaukningu eru 44-47-52-55-63-66 lykkjur í umferð og stykkið mælist ca 17-18-19-19-21-22 cm. Endið með umferð frá röngu. VINSTRA FRAMSTYKKI: Heklið 13-13-15-15-17-17 loftlykkjur með heklunál 3 og DROPS Safran. Heklið 1 stuðul í 4. loftlykkju frá heklunálinni (2 stuðlar), 1 stuðul í hverja og eina af næstu 9-9-11-11-13-13 loftlykkjum = 11-11-13-13-15-15 stuðlar. Heklið síðan A.1. Haldið áfram þar til A.1 hefur verið heklað ca 7 cm. Nú á að auka út í hvorri hlið, ekki er aukið út eins í byrjun og í lok umferðar. Haldið áfram með stuðla með A.2 yfir ystu 5 lykkjur í hvorri hlið og aukið út þannig: Aukið út um 2 stuðla við miðju að framan og 1 stuðul í hlið. Aukið er út í hverri umferð, aukið er út í 5. og 6. lykkju inn frá miðju að framan (byrjun umferðar séð frá réttu), og í 5. lykkju inn frá hlið (lok umferðar séð frá réttu). Aukið út með því að hekla 2 stuðla í hvern stuðul. Aukið út í hverri umferð alls 11-12-13-14-16-17 sinnum (aukið út um 3 stuðla í hverri umferð). Nú eru stykkin hekluð saman. FRAM- OG BAKSTYKKI: Heklið 1 stuðul í 4. loftlykkju frá heklunálinni (2 stuðlar), heklið 1 stuðul í hverja af 4 loftlykkjum, heklið 1 stuðul í hvern stuðul / loftlykkju frá vinstra framstykki, heklið 8-12-12-18-16-20 loftlykkjur, heklið 1 stuðul í hvern stuðul / loftlykkju frá bakstykki, heklið 8-12-12-18-16-20 loftlykkjur, heklið 1 stuðul í hvern stuðul / loftlykkju frá hægra framstykki, heklið 8 loftlykkjur í lok hægra framstykkis. Snúið og heklið 1 stuðul í 4. loftlykkju frá heklunálinni (2 stuðlar) og heklið 1 stuðul í hverja af 4 loftlykkjum, heklið 1 stuðul í hvern stuðul / loftlykkju út umferðina = 203-223-243-267-295-315 stuðlar. Heklið A.4 yfir lykkjur í hægri kanti að framan og A.5 yfir lykkjur í vinstri kanti að framan og 1 stuðul í hvern stuðul yfir þær lykkjur sem eftir eru. Haldið svona áfram þar til stykkið mælist 18-19-20-21-22-23 cm frá þar sem stykkin voru sett saman. Heklið 1 umferð þar sem aukið er út um 14 stuðla jafnt yfir (ekki er aukið út yfir lykkjur í A.4/ A.5) = 217-237-257-281-309-329 stuðlar. Heklið (séð frá réttu) A.5, A.6 þar til 12 lykkjur eru eftir, heklið fyrstu lykkju í A.6, heklið A.4. Þegar A.6 hefur verið heklað einu sinni á hæðina er toppurinn tilbúinn. Klippið þráðinn og festið. Toppurinn mælist ca 44-46-48-50-52-54 cm frá öxl. FRÁGANGUR: Saumið axlasauma. Tölur eru saumaðar í vinstri kant að framan. Staðsetjið efstu töluna 1 cm niður frá hálsmáli, neðstu töluna ca 4 cm frá neðri kanti og þær 3-3-3-4-4-4 tölur sem eftir eru jafnt á milli. Tölunum er hneppt í gegnum gat í hægri kanti að framan. |
||||||||||||||||
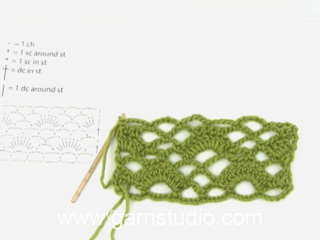
Skýringar á teikningu |
||||||||||||||||
|
||||||||||||||||

|
||||||||||||||||

|
||||||||||||||||

|
||||||||||||||||
|
Hefur þú gert þessa eða einhverja af annarri hönnun frá okkur? Merktu myndirnar þínar á samfélagsmiðlum með #dropsdesign svo að við séð þær! Vantar þig aðstoð með þetta mynstur?Þú finnur kennslumyndbönd, dálk með athugasemdum/spruningum og fleira með því að skoða mynstrið á garnstudio.com © 1982-2024 DROPS Design A/S. Við áskiljum okkur öll réttindi. Þetta skjal ásamt öllum undirhlutum þess, hefur höfundarétt. Lestu meira varðandi hvað þú mátt gera við mynstrin okkar neðst á hverju mynstri á síðunni okkar. |
||||||||||||||||


Með yfir 40 ára prjóna- og hekl hönnun, býður DROPS Design uppá eitt umfangsmesta vöruúrval af mynstrum án endurgjalds á netinu – þýdd á 17 tungumálum. Í dag þá erum við komin í 304 vörulista og 11422 mynstur - 6940 mynstur sem eru þýdd á íslensku.
Við vinnum hörðum höndum við að færa þér það besta sem prjón og hekl hefur uppá að bjóða, innblástur, ráðgjöf og auðvitað frábært gæða garn á ótrúlegu verði! Langar þig að nota mynstrin okkar fyrir annað en til einkanota? Þú getur lesið hér ákvæði hvað leyfilegt er að gera í textanum Copyright sem er neðst á öllum mynstrunum okkar.
Athugasemdir / Spurningar (19)
Igual que Irene no acabo de entender como se hacen las uniones y como se reparten las cadenetas de unión
03.06.2024 - 00:12DROPS Design answered:
Hola Maria, comienzas con el delantero izquierdo y empiezas a trabajar sobre los puntos de cadeneta del final del delantero izquierdo. Después trabajas sobre los puntos del delantero izquierdo y trabajas puntos de cadeneta, que unen el delantero izquierdo a la espalda. Después de los puntos de cadeneta sigues trabajando sobre los puntos de la espalda. Al final de la espalda, montas otros puntos de cadeneta, que unen la espalda y el delantero derecho y terminas con 8 cadenetas al final del delantero derecho (como tenías en el izquierdo). Ya tienes unida la labor.
03.06.2024 - 00:53Hello, can you please clarify the increases on the front pieces where is says to increase on the 5th stitch from the side and the 5th and 6th stitch from the mid front? It’s not clear! Does this means that on each row (on the right piece) you start with an increase in the 5th stitch from the beginning of the row and then do the 2 increases in the 5th and 6th stitch before the end of the row, so that each different row will have the alternating increases on top of each other?
16.05.2024 - 08:47DROPS Design answered:
Dear Amy, you will increase for neck in the 5th + in the 6th stitch from edge and you will increase for armhole in the 5th stitch from edge, ie seen from RS: increase in the 5th + 6th st from beg of row (V-neck) + increase in the 5th st before end of row (armhole). From WS increase in the 5th st from edge (armhole) + in the 6th +5th st before end of the row (V-neck). Happy crocheting!
16.05.2024 - 13:50Sigo sin entenderlo. Al final del delantero izquierdo se hacen 8 puntos de cadeneta y vuelvo hacia atrás, total me quedarán 6 puntos altos, y después debo hacer lo mismo con el delantero derecho, pero como no uno a la espalda?
15.04.2024 - 06:30DROPS Design answered:
Hola Marga, después de los 8 puntos de cadeneta del delantero izquierdo, giras y trabajas la fila 2: empiezas trabajando 1 punto alto en el 4º pt de cadeneta (los 3 puntos de cadeneta anteriores forman 1 punto alto) y después 1 punto alto en cada punto de la fila anterior (tanto puntos altos como de cadeneta). De este modo, trabajando puntos altos hasta sobre las cadenetas de unión entre las secciones, tendrás todos los puntos del cuerpo unidos/ juntos o regulares. No tienes que repetir lo del 4º pt de cadeneta al final de la fila, porque ya trabajaste así al inicio de la fila anterior, en el delantero derecho.
21.04.2024 - 23:57Como se unen los delanteros a la espalda, me lio con los 8 puntos y los doce puntos, no entiendo cómo hacerlos y tejerlos.
14.04.2024 - 21:22DROPS Design answered:
Hola Marga, trabaja como sigue para la talla más pequeña: Trabajar 1 punto alto en el 4º punto de cadeneta desde el ganchillo (2 puntos altos), 1 punto alto en cada uno de los 4 puntos de cadeneta, 1 punto alto en cada punto alto/punto de cadeneta del delantero izquierdo, trabajar 8 puntos de cadeneta, 1 punto alto en cada punto alto/ puntos de cadeneta de la espalda, trabajar 8 puntos de cadeneta, 1 punto alto en cada punto alto/ puntos de cadeneta del delantero derecho, trabajar 8 puntos de cadeneta al final de la fila. Cuando te señalan la secuencia de números con guiones significa que es un número diferente para cada talla.
14.04.2024 - 23:52Las explicaciones no se entienden demasiado bien. Sobre todo a la hora de hacer las uniones, imposible de entender. No sé si podré terminarlo.
14.04.2024 - 21:10Hi, I’m writing to ask about the instructions for the back, where you say increase 5 stitches in from the edge on A3. Does this mean after completing A2 and the remaining 6 trebles on the shoulder strap please? Also, it states 2 rows of A3, do I do A3 along the whole of the 43 chain stitches or just the first few as per the diagram? Do I do A3 then for all of the remaining rows on the back. Thank you
27.03.2024 - 21:02DROPS Design answered:
Dear Jenny, you increase 1 stitch on each side, working the 5th stitch from the side edge of the piece as follows: 2 treble crochet in 1 treble crochet. So you would be increasing in the last A.2 treble crochet at the beginning of the row and the first A.2 treble crochet at the end of the row. A.3 is worked over the new cast on stitches, so you repeat A.3 over all of the new chain stitches. Once you have finished working A.3 you only work A.2 and the treble crochets. Happy crochetting!
01.04.2024 - 00:25Hi, I’m writing to ask about the instructions for the back, where you say increase 5 stitches in from the edge on A3. Does this mean after completing A2 and the remaining 6 trebles on the shoulder strap please? Also, it states 2 rows of A3, do I do A3 along the whole of the 43 chain stitches or just the first few as per the diagram? Do I do A3 then for all of the remaining rows on the back. Thank you
27.03.2024 - 21:01DROPS Design answered:
Dear Jenny, you increase 1 stitch on each side, working the 5th stitch from the side edge of the piece as follows: 2 treble crochet in 1 treble crochet. So you would be increasing in the last A.2 treble crochet at the beginning of the row and the first A.2 treble crochet at the end of the row. A.3 is worked over the new cast on stitches, so you repeat A.3 over all of the new chain stitches. Once you have finished working A.3 you only work A.2 and the treble crochets. Happy crochetting!
01.04.2024 - 00:25Aan het einde van het lijf A6. Als je 3 stokjes in dezelfde steek haakt, krijg je steeds meer steken. Slechts één keer moet je ook minderen door 3 stokjes samen te haken. Je krijgt dus steeds meer steken en gezien de foto is dat niet de bedoeling. Hoe moet dat?
21.12.2023 - 22:14DROPS Design answered:
Dag Conny,
Ja, dat is verwarrend, waarschijnlijk moet deze ene steek in dat geval gewoon een stokje zijn.
14.01.2024 - 19:04Bonjour je ne comprends pas l étape de l assemblage du dos et des devants a propos des 8 maille en l air pourrais ton m éclairer par avance merci
12.09.2023 - 21:20DROPS Design answered:
Bonjour Mme Le Gac, les 8 mailles en l'air en taille S sont crochetés à la transition entre le devant gauche et le dos (pour le côté = sous le bras) et à la transition entre le dos et le devant droit (pour le côté = sous le bras); ce sont les mailles des emmanchures. Bon crochet!
13.09.2023 - 08:26Nie rozumiem w jaki sposób połączyć przody z tyłem. Robię 8 o łańcuszka potem w moim przypadku 12 o lewego przodu i dalej kompletnie nie wiem jak ruszyć.
08.09.2023 - 20:51DROPS Design answered:
Witaj Justyno, przerabiasz teraz na prawej stronie robótki: bierzesz lewy przód i przerabiasz zgodnie z opisem na początku części TYŁ & PRZODY, dalej przerabiasz 12 oł (podkrój rękawa), bierzesz tył i łączysz z przodem w jedną część przerabiając 1 słupek w każdy słupek/każde oczko łańcuszka tyłu (czyli wykonujesz narzut i wbijasz szydełko w pierwszy sł tyłu i przerabiasz słupek, itd.), przerabiasz 12 oł na podkrój rękawa i łączysz z prawym przodem przerabiając 1 słupek w każdy słupek/każde oczko łańcuszka prawego przodu, przerobić 8 oczek łańcuszka na końcu rzędu. Pozdrawiamy!
12.09.2023 - 08:55